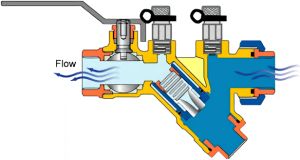
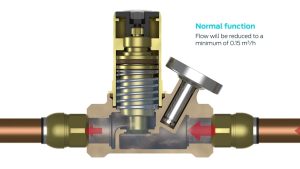
Der Einbau eines Rückschlagventils mag wie eine kleine Aufgabe klingen, ist aber entscheidend, um einen Rückfluss in Ihrem Sanitär- oder Industriesystem zu verhindern. In diesem Leitfaden erkläre ich Ihnen genau wie man ein Rückschlagventil einbaut die richtige Vorgehensweise, damit Sie häufige Fallstricke vermeiden und eine zuverlässige, dauerhafte Einrichtung erhalten.
Richtig Rückschlagventil Bei der Installation kommt es auf die richtigen Grundlagen an. Wenn Sie die Grundlagen nicht beachten, kann es zu Undichtigkeiten, Systemschäden oder - schlimmer noch - zu kostspieligen Wasserschäden in Ihrem Haus kommen.
Lassen Sie uns eintauchen.
Inhaltsübersicht
- Benötigte Werkzeuge und Materialien
- Wie man ein Rückschlagventil installiert: Schritt-für-Schritt-Anleitung
- Häufig zu vermeidende Fehler bei der Installation von Rückschlagventilen
- Wartungstipps für eine längere Lebensdauer der Ventile
- Wann Sie einen Fachmann hinzuziehen sollten
- Besondere Überlegungen für verschiedene Anwendungen
- Schlussfolgerung
Benötigte Werkzeuge und Materialien
Bevor Sie beginnen, sollten Sie die wichtigsten Dinge zusammenstellen:
- Das richtige Rückschlagventil für Ihr System (Größe und Typ)
- Rohrzange oder verstellbare Zange
- Teflonband oder Rohrgewindedichtmittel
- PVC-Kleber oder Lötset (je nach Rohrtyp)
- Rohrabschneider oder Bügelsäge
- Maßband
- Schutzausrüstung (Handschuhe und Schutzbrille)
Profi-Tipp: Die Anpassung des Ventils an den Rohrdurchmesser ist entscheidend. Zweimal messen, einmal kaufen.
Wie man ein Rückschlagventil installiert: Schritt-für-Schritt-Anleitung
1. Vorbereitung
Das Wichtigste zuerst: Schließen Sie die Hauptwasserversorgung und entleeren Sie die Leitungen durch Öffnen der Wasserhähne. Dies verhindert unerwartetes Auslaufen und einen Druckaufbau, der die Installation erschweren (und feucht machen) könnte.
Dieser Schritt ist nicht verhandelbar. Wenn Sie ihn auslassen, könnten Sie mit einem Hallenbad enden.
2. Die Auswahl des richtigen Ventils
Messen Sie Ihren Rohrdurchmesser und wählen Sie ein passendes Ventil. Vergewissern Sie sich, dass der Ventiltyp dem Druck und der Art der Flüssigkeit in Ihrem System entspricht.
Wenn Sie zum Beispiel eine vertikale Leitung mit aufwärts gerichteter Strömung installieren, ist ein federbelastetes Rückschlagventil in der Regel die beste Wahl. Bei horizontalen Installationen mit sauberem Wasser funktioniert ein Rückschlagventil oft gut.
3. Überprüfung des Zustands von Ventilen und Rohren
Überprüfen Sie sowohl das Ventil als auch das Rohr vor dem Einbau:
- Suchen Sie nach Verunreinigungen oder Schäden im Inneren des Ventils
- Rohrenden gründlich reinigen, um eine dichte Abdichtung zu gewährleisten
- Testen Sie bei Schwenkventilen die Klappe, indem Sie sie bewegen, um sicherzustellen, dass sie frei schwingt.
Eine saubere Verbindung ist eine sichere Verbindung.
4. Positionierung des Ventils
Das ist der Punkt, an dem die meisten Menschen falsch liegen.
Achten Sie auf den Durchflussrichtungspfeil auf dem Ventilgehäuse. Bauen Sie das Ventil so ein, dass der Pfeil in die Richtung des Flüssigkeitsstroms zeigt. Dies ist der #1-Installationsfehler, den ich sehe, und er macht den Zweck des Ventils völlig zunichte.
Für vertikale Installationen:
- Federunterstützte Ventile arbeiten in vertikalen Positionen
- Rückschlagklappen müssen im Allgemeinen waagerecht eingebaut werden (oder senkrecht, wenn der Durchfluss nach oben gerichtet ist).
5. Schneiden und Reinigen von Rohren
Schneiden Sie das Rohr an der markierten Stelle mit einem Rohrschneider oder einer Metallsäge sauber ab.
Entfernen Sie nun alle Grate oder rauen Kanten mit Schleifpapier oder einem Entgratungswerkzeug. Reinigen Sie dann die Enden mit einem Lappen, um Verunreinigungen zu entfernen und eine dichte Abdichtung zu gewährleisten.
6. Anbringen des Ventils
Für Gewindeventile:
- Teflonband im Uhrzeigersinn um das Außengewinde wickeln (5-7 Umdrehungen)
- Schrauben Sie das Ventil auf das Rohr
- Mit einem Schraubenschlüssel anziehen, aber nicht überdrehen
Für PVC-Verbindungen:
- Grundierung auf das Rohr und den Ventilstutzen auftragen
- PVC-Kleber auf beide Oberflächen auftragen
- Führen Sie das Rohr mit einer Vierteldrehung in das Ventil ein.
- 30 Sekunden lang halten, um die Haftung zu gewährleisten
Für gelötete Verbindungen:
- Reinigen und Auftragen von Flussmittel auf das Rohr und die Armatur
- Erhitzen Sie die Verbindung mit einem Brenner
- Lot auftragen, um eine wasserdichte Abdichtung zu schaffen
- Vollständig abkühlen lassen
7. Sicherung von Verbindungen
Ziehen Sie alle Verbindungen fest an, aber vermeiden Sie ein zu starkes Anziehen, da dies die Fittings beschädigen oder das PVC reißen kann.
Bei größeren Ventilen sollten Sie zusätzliche Halterungen in Betracht ziehen, um zu verhindern, dass die Anschlüsse mit der Zeit belastet werden.
8. Testen der Installation
Jetzt ist Showtime! Drehen Sie das Wasser langsam wieder auf und prüfen Sie alle Anschlüsse auf Dichtheit.
Vergewissern Sie sich, dass das Wasser ungehindert in die richtige Richtung fließt und dass ein Rückfluss verhindert wird, wenn der Druckausgleich erfolgt.
Häufig zu vermeidende Fehler bei der Installation von Rückschlagventilen
Nachdem ich Tausenden von Lesern bei ihren Heimwerkerprojekten geholfen habe, sind mir diese Fehler immer wieder untergekommen:
Rückwärtseinbau des Ventils
Ich habe es bereits erwähnt, aber es lohnt sich, es zu wiederholen: Achten Sie immer auf den Durchflussrichtungspfeil auf dem Ventilgehäuse. Der Einbau in umgekehrter Richtung ist wie der Einbau einer Tür, die sich in die falsche Richtung öffnet - er ist völlig unwirksam.
Verwendung der falschen Ventilgröße
Zu klein? Sie werden den Durchfluss behindern und den Druck erhöhen. Zu groß? Das Ventil kann bei geringem Durchfluss nicht richtig schließen, was seinen Zweck verfehlt.
Passen Sie die Ventilgröße immer an Ihren Rohrdurchmesser an, um eine optimale Leistung zu erzielen.
Ignorieren von Druck- und Temperaturangaben
Jedes Rückschlagventil hat bestimmte Druck- und Temperaturgrenzen. Ein Überschreiten dieser Werte kann zu einem Ausfall des Ventils, zu Leckagen oder sogar zu einem kompletten Systemausfall führen.
Die Verwendung eines PVC-Rückschlagventils in einer Heißwasserleitung kann zum Beispiel dazu führen, dass sich das Ventil verzieht und ausfällt. Passen Sie das Material Ihres Ventils an Ihre Anwendung an.
Überspringen von Gewindedichtmittel oder Klebstoff
Das ist so, als ob Sie vergessen würden, Benzin in Ihr Auto zu füllen und sich dann wundern, warum es nicht anspringt. Gewindedichtmittel (für Gewindeverbindungen) oder geeignete PVC-Grundierung und Zement (für PVC Verbindungen) sind für die Vermeidung von Leckagen unerlässlich.
Verschmutzungen im Inneren des Ventils
Verunreinigungen können die ordnungsgemäße Abdichtung des Ventils verhindern. Überprüfen und reinigen Sie das Ventil immer vor dem Einbau. Stellen Sie bei Rückschlagventilen sicher, dass sich die Klappe frei bewegen lässt.
Wartungstipps für eine längere Lebensdauer der Ventile
Ein ordnungsgemäß installiertes Rückschlagventil kann bei minimaler Wartung jahrelang halten. Aber "minimal" bedeutet nicht "keine". Hier ist, was zu tun ist:
- Jährliche Inspektion für Lecks oder Verschleiß
- Falls erforderlich, reinigen zur Entfernung von mineralischen Ablagerungen oder Schutt
- Üben Sie das Ventil gelegentlich (wenn es die Konstruktion zulässt), um ein Verkleben zu verhindern
- Achten Sie auf ungewöhnliche Geräusche wie Wasserschlag, der auf Ventilprobleme hinweisen kann
Bei industriellen Anwendungen ist der Wartungsplan des Herstellers strenger zu befolgen.
Wann Sie einen Fachmann hinzuziehen sollten
Ich bin ein großer Freund des Heimwerkens, aber manchmal ist es besser, die Profis hinzuzuziehen. Ziehen Sie professionelle Hilfe in Betracht, wenn:
- Ihr System ist komplex oder steht unter hohem Druck
- Sie installieren an der Hauptwasserleitung
- Örtliche Vorschriften erfordern eine professionelle Installation
- Sie haben kein Vertrauen in Ihre Fähigkeiten als Klempner
- Die Anlage befindet sich in einem kritischen Bereich, in dem ein Ausfall erhebliche Schäden verursachen könnte.
Besondere Überlegungen für verschiedene Anwendungen
Rückschlagventile für Sumpfpumpen
Beim Einbau eines Rückschlagventils für eine Sumpfpumpe:
- Positionieren Sie das Ventil etwa 12-18 Zoll über der Pumpe.
- Stellen Sie sicher, dass der Durchflusspfeil von der Pumpe weg zeigt.
- Verwenden Sie ein leises Rückschlagventil, um Wasserschlaggeräusche zu reduzieren.
Kessel und Heizungsanlagen
Für Heizungsanlagen:
- Verwenden Sie Ventile aus Messing oder Bronze, die für hohe Temperaturen ausgelegt sind.
- Möglichst in horizontalen Bahnen verlegen
- Erwägen Sie ein federbelastetes Rückschlagventil, um die Schwerkraftzirkulation zu verhindern.
Brunnenwasser-Systeme
Für Brunnenanlagen:
- Positionieren Sie das Ventil mindestens 18 Zoll über der Pumpe
- Installieren Sie eine Verschraubung in der Nähe des Rückschlagventils, um die Wartung zu erleichtern.
- Verwenden Sie ein Rückschlagventil, das für ständiges Untertauchen ausgelegt ist.
Schlussfolgerung
Der korrekte Einbau eines Rückschlagventils ist keine Raketenwissenschaft, aber er erfordert viel Liebe zum Detail und die Einhaltung der richtigen Schritte. Denken Sie daran, dass die wichtigsten Aspekte die Auswahl des richtigen Ventiltyps, die Sicherstellung der richtigen Durchflussrichtung und die Herstellung der richtigen Dichtungen an allen Anschlüssen sind.
Wenn Sie diesen Leitfaden befolgen, verhindern Sie einen Rückfluss, schützen Ihr Sanitärsystem und vermeiden kostspielige Wasserschäden. Und ist dieser Seelenfrieden nicht die Mühe wert?
Unabhängig davon, ob Sie ein Rückschlagventil an einer Sumpfpumpe, einem Warmwasserbereiter oder einem Bewässerungssystem installieren, bleiben die Grundlagen dieselben. Wählen Sie das richtige Ventil aus, positionieren Sie es richtig, stellen Sie die richtigen Dichtungen her und testen Sie es gründlich.
Jetzt wissen Sie genau wie man ein Rückschlagventil einbaut die über Jahre hinweg einen zuverlässigen Schutz bieten werden. Ihre Rohre (und Ihr Geldbeutel) werden es Ihnen danken.

