Si vous avez un vanne à opercule fuit lorsqu'il est fermé, vous n'êtes pas seul. J'ai été confronté à ce problème frustrant un nombre incalculable de fois et je sais à quel point il peut être ennuyeux d'avoir de l'eau qui s'écoule d'un robinet qui est censé être fermé hermétiquement.
Voici ce qu'il en est :
Les robinets-vannes peuvent présenter des fuites même lorsqu'ils sont complètement fermés en raison de l'usure des composants internes, de l'accumulation de débris ou de l'endommagement des surfaces d'étanchéité. La bonne nouvelle ? La plupart de ces fuites peuvent être réparées sans faire appel à un plombier.
Dans ce guide, je vous expliquerai exactement quelles sont les causes de ces fuites, comment identifier leur origine, et je vous donnerai des instructions étape par étape pour les réparer vous-même.
Table des matières
- Pourquoi les robinets-vannes fuient-ils lorsqu'ils sont fermés ?
- Types de fuites des robinets-vannes
- Comment réparer un robinet-vanne qui fuit
- Quand remplacer ou réparer ?
- Passage à un robinet à boisseau sphérique
- Conseils de prévention
- Les erreurs courantes à éviter
- Considérations sur les coûts
- Mon expérience personnelle
- Le bilan
Pourquoi les robinets-vannes fuient-ils lorsqu'ils sont fermés ?
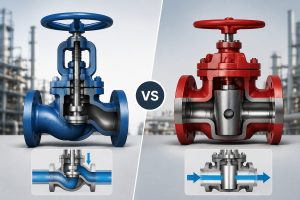
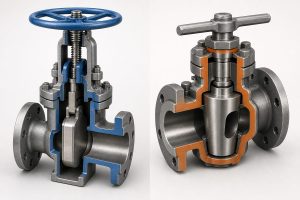
Les robinets-vannes fonctionnent en abaissant une vanne métallique (ou un coin) dans le corps du robinet pour bloquer l'écoulement de l'eau. Lorsque tout fonctionne correctement, l'opercule crée un joint étanche contre les sièges de la vanne.
Mais voici ce qui ne va pas :
Sièges de soupapes et vannes usés
La raison #1 pour laquelle les robinets-vannes fuient lorsqu'ils sont fermés est l'usure des surfaces d'étanchéité internes.
Pensez-y :
Chaque fois que vous ouvrez et fermez cette valve, le métal frotte contre le métal. Au fil du temps, ce frottement crée de minuscules rayures et rainures qui empêchent une étanchéité parfaite.
J'ai travaillé un jour sur un robinet-vanne installé en 1985. Lorsque je l'ai finalement démontée, les sièges des vannes semblaient avoir été passés au papier de verre. Il n'est donc pas étonnant qu'il y ait eu des fuites importantes.
Gîtes minéraux et débris
Voici une chose dont la plupart des gens ne se rendent pas compte :
Avec le temps, des sédiments, des particules de rouille et des dépôts minéraux peuvent s'accumuler à l'intérieur de votre vanne. Ces saletés empêchent physiquement l'opercule d'affleurer les sièges de la soupape.
C'est comme essayer de fermer une porte avec un caillou coincé dans l'embrasure.
Dommages dus à la corrosion
Eau + métal + temps = corrosion.
En particulier si vous avez de l'eau dure ou si vous vivez dans une région où la composition chimique de l'eau est agressive, la corrosion peut ronger les composants internes de votre robinet.
J'ai vu des vannes dont l'opercule était tellement corrodé qu'il ressemblait à du gruyère. Il est évident que cela ne tient pas la route.
Fluctuations de température
Celui-ci est sournois :
Les changements de température fréquents provoquent la dilatation et la contraction des composants métalliques. Avec le temps, cela peut déformer les sièges des soupapes ou créer des lacunes dans les surfaces d'étanchéité.
Types de fuites des robinets-vannes
Avant de réparer un robinet-vanne qui fuit, il faut déterminer d'où vient la fuite.
Il en existe trois types principaux :
Fuite à travers la valve
C'est le cas lorsque l'eau s'écoule à travers le robinet bien qu'il soit fermé. Vous remarquerez que de l'eau s'écoule des tuyaux ou des appareils en aval du robinet.
Signes communs :
- Des toilettes qui ne cessent de se remplir
- Robinets qui gouttent
- Compteur d'eau qui tourne sans arrêt
Fuite de tige
Vous voyez de l'eau s'écouler autour de la poignée du robinet ? Il s'agit d'une fuite au niveau de la tige.
Le matériau de garniture autour de la tige du robinet est usé, ce qui permet à l'eau de s'échapper.
Fuite du corps
C'est le pire des scénarios. Le corps de la valve lui-même est fissuré ou corrodé, ce qui provoque une fuite d'eau.
Comment réparer un robinet-vanne qui fuit
Passons maintenant aux choses sérieuses - réparons cette fuite.
Solution rapide : serrer l'écrou de garniture
Si vous avez des fuites au niveau de la tige (eau qui s'écoule de la zone de la poignée), essayez d'abord ceci :
- Localisez l'écrou de garniture (il s'agit de l'écrou hexagonal situé juste sous la poignée).
- Utilisez une clé à molette pour le serrer d'un quart de tour dans le sens des aiguilles d'une montre.
- Vérifier si la fuite s'arrête
- Si ce n'est pas le cas, serrer encore de 1/8 de tour
Ne serrez pas trop fort - vous rendriez la poignée difficile à tourner.
La méthode de la chasse d'eau
Pour les fuites au niveau de la vanne de passage causées par des débris :
- Ouvrir un robinet en aval
- Ouvrir et fermer rapidement le robinet-vanne 5 à 10 fois
- L'eau vive peut déloger des débris.
- Fermer le robinet et vérifier si la fuite s'est arrêtée
Je dirais que cela fonctionne dans environ 40% des cas. Cela vaut la peine d'essayer avant de passer à des réparations plus complexes.
Remplacer la garniture
Si le serrage n'a pas fonctionné, vous aurez besoin d'un nouveau matériau d'emballage :
- Couper l'alimentation en eau
- Retirer la poignée (généralement maintenue par une vis)
- Desserrer et retirer l'écrou de garniture
- Retirer l'ancien emballage à l'aide d'un pic ou d'un petit tournevis.
- Enrouler la nouvelle corde d'emballage autour de la tige (3-4 tours).
- Réinstaller l'écrou de garniture et la poignée
Conseil de pro : utilisez Téflon la corde de garniture - elle dure beaucoup plus longtemps que la garniture traditionnelle en graphite.
Reconstruction complète des soupapes
En cas de fuites internes importantes, vous devrez reconstruire ou remplacer la valve.
Voici la réalité :
Les robinets-vannes sont notoirement difficiles à reconstruire avec succès. Les composants internes doivent être usinés selon des tolérances précises, et même de petites imperfections peuvent provoquer des fuites.
Mon conseil ? Si la valve a plus de 10 ans et qu'elle fuit beaucoup, remplacez-la.
Quand remplacer ou réparer ?
Permettez-moi de vous faire gagner du temps et de vous épargner de la frustration.
Remplacer la valve si :
- Il a plus de 15 ans
- Vous constatez une corrosion visible sur le corps
- Plusieurs tentatives de réparation ont échoué
- Il s'agit d'un arrêt critique (comme l'alimentation principale en eau).
Réparer si :
- Il est relativement récent (moins de 5 ans)
- Faible fuite de la tige
- Vous pouvez voir les débris évidents qui causent le problème
Passage à un robinet à boisseau sphérique
Voici ce que je dis à tout le monde :
Si vous devez remplacer un robinet-vanne, installez plutôt un robinet à boisseau sphérique.
Pourquoi ?
Les vannes à bille sont tout simplement plus fiables. Ils utilisent une bille rotative percée d'un trou plutôt qu'une vanne coulissante. Cette conception est moins sujette aux problèmes de débris et offre une meilleure étanchéité.
J'ai remplacé tous les robinets-vannes de ma maison par des robinets à bille il y a cinq ans. Je n'ai pas eu une seule fuite depuis.
Conseils de prévention
Vous voulez éviter les fuites sur les robinets-vannes à l'avenir ?
Exercez vos soupapes
C'est énorme :
Ouvrez et fermez vos vannes au moins deux fois par an. Cela permet d'éviter l'accumulation de sédiments et le grippage des composants internes.
Je le fais à chaque fois que je change les filtres de mon système de chauffage, de ventilation et de climatisation - c'est facile à retenir.
Installer des filtres à sédiments
Si vous avez des problèmes d'eau dure ou de sédiments, envisagez d'installer un filtre à sédiments dans toute la maison.
Moins de saletés dans l'eau = moins de saletés dans les vannes.
Utiliser correctement les vannes
Les robinets-vannes sont conçus pour être complètement ouverts ou complètement fermés. Leur utilisation en position partiellement ouverte entraîne une usure excessive des sièges.
Pour limiter le débit, utilisez plutôt un robinet à soupape ou un robinet à boisseau sphérique.
Les erreurs courantes à éviter
J'ai vu des gens commettre ces erreurs à maintes reprises :
Serrage excessif
Le fait d'appuyer sur la poignée n'arrêtera pas une fuite causée par des sièges endommagés. Vous ne ferez qu'endommager davantage la soupape.
Utiliser les mauvaises réparations
J'ai vu une fois quelqu'un essayer de réparer un robinet-vanne qui fuyait avec du mastic de plombier. Spoiler : ça n'a pas marché.
Utiliser les bons matériaux pour le travail.
Ignorer les petites fuites
Une petite fuite aujourd'hui devient une inondation demain. Réglez les problèmes lorsqu'ils sont mineurs.
Considérations sur les coûts
Parlons argent :
- Matériel d'emballage : $5-10
- Nouveau robinet-vanne : $20-100 (selon la taille)
- Amélioration du robinet à boisseau sphérique : $30-150
- Installation du plombier : $150-300
Les réparations faites soi-même peuvent vous permettre d'économiser beaucoup d'argent, mais il faut connaître ses limites. Une réparation bâclée d'un robinet d'arrêt principal peut entraîner des milliers de dégâts d'eau.
Mon expérience personnelle
L'année dernière, j'ai aidé mon voisin à réparer un robinet-vanne qui fuyait depuis des mois.
Il avait mis un seau sous le moteur et le vidait tous les jours. Lorsque nous l'avons finalement démontée, les sièges des soupapes étaient complètement abîmés.
Nous l'avons remplacé par un robinet à boisseau sphérique de qualité et il m'a envoyé un SMS la semaine dernière pour me dire qu'il fonctionnait toujours parfaitement et qu'il n'y avait aucune fuite.
La leçon à en tirer ? Ne vivez pas avec des vannes qui fuient. Réparez-les correctement et une seule fois.
Le bilan
A vanne à guillotine fuyant lorsqu'elle est fermée est généralement due à l'usure des composants internes, à l'accumulation de débris ou à la défaillance de la garniture de la tige.
Si certaines fuites peuvent être réparées par des opérations simples telles que le resserrement de l'écrou de presse-étoupe ou le rinçage des débris, les vannes plus anciennes doivent souvent être remplacées.
Ma recommandation ? Si votre robinet-vanne vous pose problème, envisagez de le remplacer par un robinet à boisseau sphérique. Ils sont plus fiables, plus faciles à utiliser et moins sujets aux fuites.
N'oubliez pas que la réparation rapide des fuites de robinet permet d'éviter les dégâts des eaux et d'économiser de l'argent sur votre facture d'eau. Ne remettez pas les choses à plus tard - réparez cette fuite dès aujourd'hui.