Привет! Сегодня я покажу вам, как установить поворотный клапан для надежной и бесперебойной работы.
Если вы работаете с системами управления потоком, вам необходимо знать как установить поворотный клапан правильно, имеет решающее значение. Ошибитесь, и вы можете столкнуться с протечками, преждевременным износом или даже полным отказом системы.
Хорошие новости? Установка этих клапанов не является ракетостроением, если вы знаете, что делаете.
Я провел бесчисленное количество часов, исследуя и тестируя различные методы установки, и разложил все это на практические шаги, которые вы можете выполнить уже сегодня.
Давайте погрузимся!
Оглавление
- Что нужно знать перед началом работы
- Подготовка трубопровода
- Как установить дроссельный клапан?
- Общие ошибки, которых следует избегать
- Специальные соображения для различных типов клапанов
- Советы по обслуживанию для долговременной работы
- Устранение распространенных проблем при установке поворотных затворов
- Специализированные сценарии установки
- Заключительные размышления
Что нужно знать перед началом работы
Прежде чем взять в руки свой первый гаечный ключ, необходимо проверить некоторые важные моменты:
Проверка перед установкой
Прежде чем приступить к работе с трубопроводом, необходимо тщательно проверить дроссельный клапан:
- Визуальный осмотр: Ищите любые повреждения корпуса клапана, диска или седла.
- Проверка технических характеристик: Убедитесь, что номинальные параметры клапана по давлению и температуре соответствуют вашему применению
- Проверка размера: Убедитесь, что размер клапана соответствует техническим характеристикам вашего трубопровода
- Эксплуатационный тест: Вручную вращайте диск, чтобы обеспечить плавное движение
- Подтверждение направления: Проверьте правильность маркировки положения "открыто/закрыто
- Документация: Убедитесь, что все идентификационные бирки и маркировка читаемы
Всегда помните: хорошая установка начинается с хорошей подготовки.
Безопасность превыше всего!
Это не просто фраза, брошенная на ветер. Работа с промышленными клапанами может быть опасной, если не принять надлежащих мер предосторожности:
ВНИМАНИЕ: Никогда не пытайтесь устанавливать или снимать клапаны в системах, находящихся под давлением. Это может привести к серьезным травмам или смерти.
Дополнительные меры безопасности:
- Всегда сбрасывайте давление и сливайте воду из трубопровода
- Наденьте соответствующие СИЗ (перчатки, защитные очки).
- Соблюдайте процедуры работы в замкнутом пространстве, если это необходимо
Подготовка трубопровода
Прежде чем приступить к установке арматуры, необходимо должным образом подготовить сам трубопровод:
- Тщательно очистите: Удалите весь мусор, окалину и старый прокладочный материал с концов труб.
- Проверка выравнивания: Убедитесь, что фланцы труб параллельны и правильно выровнены.
- Измерение пространства: Убедитесь в том, что зазор между фланцами может соответствовать размерам клапана по торцам
Пропускать эти шаги - все равно что строить дом на шатком фундаменте. Не делайте этого!
Как установить дроссельный клапан?
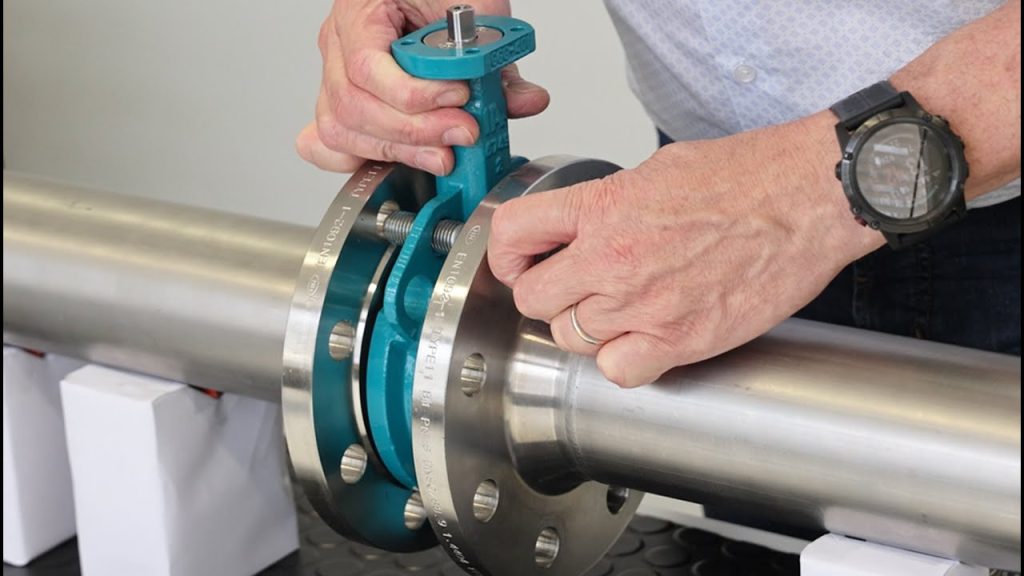
Теперь к главному событию. Вот как правильно установить дроссельный клапан:
Шаг 1: Установите клапан
Во-первых, необходимо правильно расположить клапан:
- Установите клапан между фланцами в слегка открытом положении (не полностью закрытом).
- Убедитесь, что направление вращения соответствует требованиям вашей системы
- Убедитесь, что стрелка направления потока (если она есть) совпадает с направлением потока в вашей системе
Шаг 2: Вставьте прокладки (если требуется)
Для установки некоторых поворотных затворов требуются прокладки:
- Установите прокладки между клапаном и фланцем.
- Убедитесь, что прокладки чистые и неповрежденные
- Убедитесь, что материал прокладки совместим с технологической средой
Шаг 3: Вставьте болты и гайки
Правильное крепление болтов имеет решающее значение для герметичной установки:
- Вставьте болты через фланцы и клапан
- Затяните гайки вручную
- Убедитесь, что длина болта соответствует требованиям (не слишком короткий и не слишком длинный).
- При необходимости используйте соответствующие шайбы
Шаг 4: Отцентрируйте клапан
Правильная регулировка клапана предотвращает утечку и обеспечивает плавную работу:
- Тщательно отцентрируйте клапан между фланцами
- Убедитесь, что корпус клапана расположен перпендикулярно трубопроводу
- Убедитесь, что диск может полностью открыться без помех
Шаг 5: Последовательное затягивание болтов
Именно здесь многие установки идут не по плану. Следуйте этой схеме:
- Сначала затяните болты вручную
- Следуйте крестообразной схеме (как при затягивании гаек на автомобильном колесе)
- Постепенно увеличивайте крутящий момент за несколько проходов
- Используйте динамометрический ключ для достижения указанных производителем значений крутящего момента
Шаг 6: Проверка правильности работы
Прежде чем вводить систему в эксплуатацию:
- Откройте и закройте клапан несколько раз, чтобы обеспечить плавную работу.
- Проверьте, нет ли сцепления или необычного сопротивления
- Проверьте полный ход диска
- Убедитесь, что ориентация рукоятки или привода соответствует положению "открыто/закрыто".
Общие ошибки, которых следует избегать
Я видел эти ошибки слишком много раз:
Чрезмерная затяжка
Мнение "чем туже, тем лучше" может привести к повреждению клапана. Чрезмерный крутящий момент может:
- Деформация корпуса клапана
- Повредить сиденье
- Создайте неравномерное сжатие
- Затрудняют работу с дисками
Неправильное положение диска при установке
Установка с полностью открытым или полностью закрытым диском может привести к проблемам:
- Диск может упираться в стенки трубы
- Возможна неравномерная посадка
- Края диска могут быть повреждены
Проблемы несоосности
Плохое выравнивание приводит к преждевременному выходу из строя:
- Напряжение трубопровода передается на клапан
- Неравномерное сжатие прокладки
- Утечка во фланцевых соединениях
- Сложная эксплуатация
Специальные соображения для различных типов клапанов
Не все поворотные затворы созданы одинаковыми:
Клапаны типа "вафля
Они устанавливаются между фланцами без полного завинчивания:
- Требуют тщательного центрирования
- Для правильной установки могут потребоваться проставки
- Можно установить меньшее количество болтов
Клапаны с наконечниками
Они имеют резьбовые вставки для прямого крепления болтами:
- Возможность тупикового обслуживания (одна сторона может быть удалена при сохранении давления)
- Требуется сбалансированная затяжка болтов
- Необходимо обратить особое внимание на длину болтов
Высокопроизводительные дисковые затворы
Эти прецизионные клапаны требуют особой осторожности:
- Часто имеют специальные конструкции сидений
- Может потребоваться особое расположение дисков при установке
- Может потребоваться точная спецификация крутящего момента
Советы по обслуживанию для долговременной работы
После идеальной установки вот как обеспечить бесперебойную работу:
- Регулярный осмотр: Проверьте, нет ли признаков утечки, коррозии или эрозии.
- Периодическая эксплуатация: Регулярно циклируйте клапаны для предотвращения заедания
- Проверки болтов: Проверьте момент затяжки болтов, особенно в системах с циклическим изменением температуры
- Документация: Вести учет работы клапанов и технического обслуживания
Устранение распространенных проблем при установке поворотных затворов
Даже выполнив эти действия, вы можете столкнуться с проблемами:
Утечки на фланцевых соединениях
Возможные причины:
- Недостаточный момент затяжки болтов
- Неравномерная затяжка
- Поврежденные прокладки
- Несовпадение фланцев
Решение: Заново затяните болты в правильной последовательности или замените прокладки, если они повреждены.
Сложная операция
Если клапан трудно повернуть:
- Проверка на наличие напряжения в трубопроводе
- Проверьте зазор между дисками
- Обеспечьте надлежащую смазку штока
- Подтвердите правильность выравнивания
Неполное закрытие
Когда клапан не закрывается полностью:
- Ищите мусор между диском и седлом
- Проверьте, не поврежден ли диск
- Проверьте соединение штока с диском
- Подтвердите настройки хода привода (если применимо)
Специализированные сценарии установки
Некоторые ситуации требуют особого внимания:
Подземная установка
За службу в похоронном деле:
- Используйте коррозионностойкие материалы
- Рассмотрите возможность использования удлинительных стеблей для доступа
- Обеспечьте достаточную поддержку для предотвращения оседания
- Используйте соответствующие клапанные коробки для доступа
Высокотемпературные применения
При работе с жарой:
- Учесть тепловое расширение
- Используйте соответствующие прокладочные материалы
- Рассмотрим специальные материалы для болтов
- Соблюдайте специальные значения крутящего момента для повышенных температур
Криогенная служба
Для применения в условиях сильного холода:
- Используйте материалы, рассчитанные на низкие температуры
- Рассмотрите специальные конструкции сидений
- Следуйте специальным процедурам установки
- Позволяют сжиматься при низких температурах
Заключительные размышления
Правильная установка поворотного затвора - это не только предотвращение протечек, но и обеспечение долгосрочной производительности, безопасности и эффективности.
Выполнив описанные мной действия и избежав распространенных ошибок, вы добьетесь надежной установки, которая обеспечит долгие годы бесперебойной работы.
Помните, что, несмотря на то, что данное руководство содержит исчерпывающую информацию, всегда обращайтесь к инструкциям по установке конкретного производителя клапанов, поскольку конструктивные особенности могут потребовать специальных процедур.
Есть ли у вас какие-либо особые проблемы с установкой как установить поворотный клапан? Оставьте комментарий ниже, и я помогу вам устранить неполадки!