Hallo zusammen! Heute zeige ich euch genau, wie man eine Absperrklappe für zuverlässige, leckagefreie Leistung.
Wenn Sie mit Durchflusskontrollsystemen arbeiten, sollten Sie wissen wie man eine Absperrklappe einbaut ist absolut entscheidend. Wenn Sie es falsch machen, kann es zu Undichtigkeiten, vorzeitigem Verschleiß oder sogar zu einem kompletten Systemausfall kommen.
Die gute Nachricht? Der Einbau dieser Ventile ist keine Raketenwissenschaft, wenn man weiß, was man tut.
Ich habe zahllose Stunden damit verbracht, verschiedene Installationsmethoden zu erforschen und zu testen, und ich habe das alles in umsetzbare Schritte unterteilt, die Sie heute befolgen können.
Lasst uns eintauchen!
Inhaltsübersicht
- Was Sie vor dem Start wissen müssen
- Vorbereitungen für Ihre Pipeline
- Wie installiert man eine Absperrklappe?
- Häufig zu vermeidende Fehler
- Besondere Überlegungen für verschiedene Ventiltypen
- Wartungstipps für dauerhafte Leistung
- Fehlersuche bei häufigen Problemen bei der Installation von Absperrklappen
- Spezialisierte Installationsszenarien
- Abschließende Überlegungen
Was Sie vor dem Start wissen müssen
Bevor Sie Ihren ersten Schraubenschlüssel in die Hand nehmen, sollten Sie einige wichtige Dinge überprüfen:
Inspektion vor der Installation
Ihre Absperrklappe muss gründlich überprüft werden, bevor sie in die Nähe Ihrer Rohrleitung kommt:
- Visuelle Kontrolle: Achten Sie auf Schäden am Ventilgehäuse, am Ventilteller oder am Ventilsitz.
- Überprüfung der Spezifikation: Prüfen Sie, ob die Druck- und Temperaturwerte des Ventils für Ihre Anwendung geeignet sind.
- Überprüfung der Größe: Vergewissern Sie sich, dass die Größe des Ventils mit den Spezifikationen Ihrer Rohrleitung übereinstimmt.
- Betriebstest: Drehen Sie die Scheibe von Hand, um eine gleichmäßige Bewegung zu gewährleisten.
- Richtungsweisende Bestätigung: Prüfen Sie, ob die Markierungen für die offene/geschlossene Position korrekt sind.
- Dokumentation: Prüfen Sie, ob alle Kennzeichnungsschilder und Markierungen lesbar sind.
Denken Sie immer daran: Eine gute Installation beginnt mit einer guten Vorbereitung.
Sicherheit geht vor!
Das ist nicht nur ein Spruch zum Wegwerfen. Die Arbeit mit Industriearmaturen kann gefährlich sein, wenn man nicht die richtigen Vorsichtsmaßnahmen trifft:
WARNUNG: Versuchen Sie niemals, Ventile von unter Druck stehenden Systemen zu installieren oder zu entfernen. Schwere Verletzungen oder Tod könnten die Folge sein.
Zusätzliche Sicherheitsmaßnahmen:
- Die Rohrleitung immer drucklos machen und entleeren
- Tragen Sie geeignete PSA (Handschuhe, Schutzbrille)
- Befolgen Sie gegebenenfalls die Verfahren für beengte Räume
Vorbereitungen für Ihre Pipeline
Die Rohrleitung selbst muss ordnungsgemäß vorbereitet werden, bevor mit dem Einbau der Armaturen begonnen werden kann:
- Gründlich reinigen: Entfernen Sie alle Ablagerungen, Zunder und altes Dichtungsmaterial von den Rohrenden.
- Ausrichtungsprüfung: Sicherstellen, dass die Rohrflansche parallel und richtig ausgerichtet sind
- Raumfahrtmessung: Vergewissern Sie sich, dass der Abstand zwischen den Flanschen das Baulängenmaß der Armatur aufnehmen kann.
Das Überspringen dieser Schritte ist wie der Bau eines Hauses auf einem wackeligen Fundament. Tun Sie es nicht!
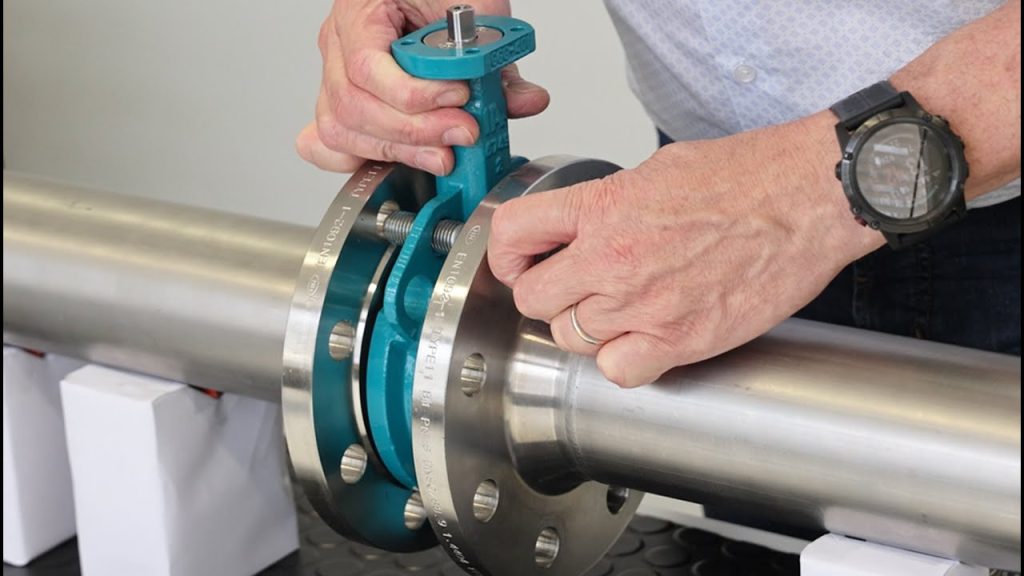
Wie installiert man eine Absperrklappe?
Und nun zum eigentlichen Thema. Hier erfahren Sie, wie man eine Absperrklappe richtig einbaut:
Schritt 1: Positionierung des Ventils
Zunächst müssen Sie Ihr Ventil richtig positionieren:
- Legen Sie das Ventil zwischen die Flansche in leicht geöffneter Position (nicht vollständig geschlossen)
- Stellen Sie sicher, dass die Drehrichtung Ihren Systemanforderungen entspricht.
- Prüfen Sie, ob der Durchflussrichtungspfeil (falls vorhanden) mit Ihrem Systemfluss übereinstimmt.
Schritt 2: Dichtungen einsetzen (falls erforderlich)
Einige Klappeninstallationen erfordern Dichtungen:
- Dichtungen zwischen Armaturen- und Flanschflächen positionieren
- Sicherstellen, dass die Dichtungen sauber und unbeschädigt sind
- Prüfen Sie, ob das Dichtungsmaterial mit Ihren Prozessmedien kompatibel ist.
Schritt 3: Schrauben und Muttern einsetzen
Eine ordnungsgemäße Verschraubung ist entscheidend für eine leckagefreie Installation:
- Schrauben durch Flansche und Armatur stecken
- Muttern zunächst handfest anziehen
- Stellen Sie sicher, dass die Schraubenlänge angemessen ist (nicht zu kurz, nicht zu lang).
- Bei Bedarf geeignete Unterlegscheiben verwenden
Schritt 4: Zentrieren des Ventils
Eine korrekte Ausrichtung der Ventile verhindert Leckagen und gewährleistet einen reibungslosen Betrieb:
- Zentrieren Sie das Ventil sorgfältig zwischen den Flanschen
- Prüfen Sie, ob das Ventilgehäuse senkrecht zur Rohrleitung steht.
- Stellen Sie sicher, dass sich die Scheibe vollständig und ungehindert öffnen kann.
Schritt 5: Schrauben der Reihe nach anziehen
Dies ist der Punkt, an dem viele Installationen scheitern. Folgen Sie diesem Muster:
- Schrauben zuerst handfest anziehen
- Folgen Sie einem kreuz und quer verlaufenden Muster (wie beim Anziehen von Radmuttern an einem Autorad)
- Schrittweise Erhöhung des Drehmoments in mehreren Durchgängen
- Verwenden Sie einen Drehmomentschlüssel, um die vom Hersteller angegebenen Werte zu erreichen.
Schritt 6: Test auf ordnungsgemäßen Betrieb
Bevor Sie Ihr System in Betrieb nehmen:
- Öffnen und schließen Sie das Ventil einige Male, um einen reibungslosen Betrieb zu gewährleisten.
- Auf Bindung oder ungewöhnlichen Widerstand prüfen
- Überprüfen Sie den vollen Weg der Scheibe
- Prüfen Sie, ob die Ausrichtung des Griffs oder des Betätigungselements mit der offenen/geschlossenen Position übereinstimmt.
Häufig zu vermeidende Fehler
Ich habe diese Fehler schon zu oft gesehen:
Überdrehen
Die Einstellung "fester anziehen ist besser" kann Ihre Armatur tatsächlich beschädigen. Übermäßiges Drehmoment kann:
- Verformung des Ventilkörpers
- Beschädigung des Sitzes
- Ungleichmäßige Kompression erzeugen
- Diskettenbetrieb erschweren
Unsachgemäße Positionierung der Scheibe beim Einbau
Der Einbau bei vollständig geöffneter oder geschlossener Scheibe kann zu Problemen führen:
- Die Scheibe kann sich an den Rohrwänden festsetzen
- Ungleichmäßiges Sitzen kann auftreten
- Scheibenränder können beschädigt werden
Probleme mit Ausrichtungsfehlern
Eine schlechte Ausrichtung führt zu einem vorzeitigen Ausfall:
- Auf das Ventil übertragene Spannung in der Rohrleitung
- Ungleichmäßige Kompression der Dichtung
- Leckage an Flanschverbindungen
- Schwierige Operation
Besondere Überlegungen für verschiedene Ventiltypen
Nicht alle Absperrklappen sind gleich:
Ventile in Zwischenflanschbauweise
Diese passen zwischen die Flansche ohne vollständige Verschraubung:
- Erfordern eine sorgfältige Zentrierung
- Möglicherweise sind Abstandshalter für die richtige Passform erforderlich
- Kann mit weniger Bolzen installiert werden
Lug-Style-Ventile
Diese haben Gewindeeinsätze für die direkte Verschraubung:
- Ermöglicht Dead-End-Betrieb (eine Seite kann unter Beibehaltung des Drucks entfernt werden)
- Erfordern einen ausgewogenen Schraubenanzug
- Besonderes Augenmerk muss auf die Schraubenlänge gelegt werden
Hochleistungs-Absperrklappen
Diese Präzisionsventile erfordern besondere Sorgfalt:
- haben oft spezielle Sitzkonstruktionen
- Kann eine besondere Positionierung der Scheibe während der Installation erfordern
- Könnte genaue Drehmomentangaben erfordern
Wartungstipps für dauerhafte Leistung
Nach der perfekten Installation erfahren Sie hier, wie Sie dafür sorgen, dass alles reibungslos funktioniert:
- Regelmäßige Inspektion: Prüfen Sie auf Anzeichen von Leckagen, Korrosion oder Erosion
- Regelmäßiger Betrieb: Ventile regelmäßig zyklieren, um ein Festfressen zu verhindern
- Bolzenkontrollen: Überprüfen Sie das Anzugsmoment der Schrauben, insbesondere in Systemen mit Temperaturschwankungen.
- Dokumentation: Führen Sie Aufzeichnungen über die Leistung der Ventile und die Wartungsaktivitäten
Fehlersuche bei häufigen Problemen bei der Installation von Absperrklappen
Auch wenn Sie diese Schritte befolgen, können Probleme auftreten:
Leckage an Flanschanschlüssen
Mögliche Ursachen:
- Unzureichendes Schraubendrehmoment
- Ungleichmäßige Straffung
- Beschädigte Dichtungen
- Falsch ausgerichtete Flansche
Lösung: Ziehen Sie die Schrauben in der richtigen Reihenfolge nach oder ersetzen Sie die Dichtungen, wenn sie beschädigt sind.
Schwierige Operation
Wenn das Ventil schwer zu drehen ist:
- Prüfung auf Rohrleitungsspannung
- Überprüfung des Scheibenspiels
- Richtige Schmierung der Spindel sicherstellen
- Bestätigen Sie die korrekte Ausrichtung
Unvollständige Schließung
Wenn sich das Ventil nicht vollständig schließen lässt:
- Suchen Sie nach Verunreinigungen zwischen Scheibe und Sitz
- Prüfen Sie die Scheibe auf Schäden
- Verbindung Spindel/Scheibe prüfen
- Bestätigen Sie die Hubeinstellungen des Stellantriebs (falls zutreffend)
Spezialisierte Installationsszenarien
Manche Situationen erfordern besondere Aufmerksamkeit:
Unterirdische Installation
Für Beerdigungsdienste:
- Verwendung korrosionsbeständiger Materialien
- Erwägen Sie Verlängerungsstiele für den Zugang
- Angemessene Unterstützung, um Setzungen zu verhindern
- Verwenden Sie geeignete Ventilkästen für den Zugang
Hochtemperaturanwendungen
Beim Umgang mit Hitze:
- Wärmeausdehnung zulassen
- Geeignete Dichtungsmaterialien verwenden
- Spezielle Schraubenmaterialien berücksichtigen
- Beachten Sie die spezifischen Drehmomentwerte für erhöhte Temperaturen
Kryogener Service
Für extrem kalte Anwendungen:
- Verwenden Sie Materialien, die für niedrige Temperaturen ausgelegt sind.
- Erwägen Sie spezielle Sitzkonstruktionen
- Befolgen Sie spezifische Installationsverfahren
- Ermöglicht Schrumpfung bei niedrigen Temperaturen
Abschließende Überlegungen
Bei der korrekten Installation einer Absperrklappe geht es nicht nur um die Vermeidung von Leckagen, sondern auch um die Gewährleistung von langfristiger Leistung, Sicherheit und Effizienz.
Wenn Sie die von mir beschriebenen Schritte befolgen und häufige Fallstricke vermeiden, werden Sie eine zuverlässige Installation erreichen, die jahrelang störungsfrei funktionieren sollte.
Denken Sie daran, dass dieser Leitfaden zwar eine umfassende Anleitung bietet, Sie aber immer die Installationsanweisungen Ihres spezifischen Ventilherstellers beachten sollten, da Konstruktionsabweichungen besondere Verfahren erfordern können.
Haben Sie besondere Probleme bei der Installation von wie man eine Absperrklappe einbaut? Hinterlassen Sie unten einen Kommentar, und ich helfe Ihnen bei der Fehlersuche!