Vous êtes-vous déjà demandé, dans le rayon plomberie, si vous aviez besoin d'un robinet à boisseau sphérique ordinaire ou de cette version “à glissière” dont vous a parlé le vendeur ?
Vous n'êtes pas seul.
Voici ce qu'il en est : vanne à bille et vanne à bille coulissante se résume à une seule chose : la façon dont ils se raccordent à vos canalisations. Cette seule différence peut vous faire gagner (ou perdre) des heures d'installation.
Dans ce guide, en tant que professionnel fabricant de robinets à tournant sphérique, Dans cet article, j'expliquerai exactement quand utiliser un robinet à boisseau sphérique ou un robinet à boisseau sphérique coulissant, comment les installer et lequel convient le mieux à votre projet.
Ça vous dit quelque chose ? Entrons dans le vif du sujet.

Qu'est-ce qu'un robinet à boisseau sphérique standard ?
Commençons par les principes de base.
Un robinet à boisseau sphérique standard utilise une bille rotative percée d'un trou pour contrôler le débit. En tournant la poignée de 90 degrés, vous ouvrez ou fermez complètement l'écoulement.
Simple.
Ces vannes sont généralement livrées avec :
- Extrémités filetées (NPT)
- Raccords à brides
- Joints soudés
- Raccords soudés
L'essentiel ? Vous avez besoin d'outils et de compétences pour les installer. Il s'agit de clés à pipe, de ruban de téflon, voire d'un chalumeau pour la soudure.
Mais voici pourquoi cela est important :
Les robinets à tournant sphérique standard créent des connexions permanentes et solides comme le roc. Une fois qu'ils sont en place, ils ne vont nulle part.
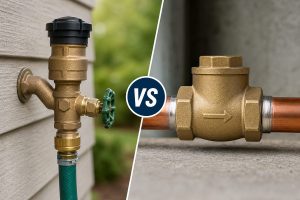
En quoi un robinet à boisseau sphérique est-il différent ?
Passons maintenant à la vanne à bille coulissante.
(Parfois appelées valves "push-fit" ou "push-to-connect").
Ces mauvais garçons se glissent directement sur votre tuyau - pas de filetage, pas de soudure, pas d'outils spéciaux.
Comment ?
Le robinet est doté d'un anneau de serrage intégré et d'un système de joint torique. Il suffit d'enfoncer le tuyau pour qu'il s'enclenche.
Pensez-y comme aux connecteurs en plastique de votre tuyau d'arrosage. Poussez, cliquez, c'est fait.
Le résultat ? L'installation prend environ 2 minutes au lieu de 20.
Comparaison tête à tête : Robinet à boisseau sphérique vs robinet à boisseau sphérique à glissement
Permettez-moi de présenter les principales différences :
Vitesse d'installation
- Clapet anti-retour: Moins de 2 minutes (je l'ai chronométré)
- Soupape standard: 10-30 minutes selon le type
Outils nécessaires
- Clapet anti-retour: Un simple coupe-tube
- Soupape standard: Clés, produits d'étanchéité, éventuellement matériel de soudure
Traitement de la pression
- Clapet anti-retour: Bon pour le résidentiel (jusqu'à 200 PSI)
- Soupape standard: Peut supporter des pressions industrielles (1 000+ PSI)
Réutilisation
- Clapet anti-retour: Limité (peut-être 2 à 3 fois maximum)
- Soupape standard: Entièrement réutilisable
Coût
- Clapet anti-retour: Montant initial plus élevé ($15-40)
- Soupape standard: Moins d'avance ($5-20)
Conseil de pro : Ne vous contentez pas du prix affiché. Prenez en compte le temps d'installation et les outils nécessaires.
Quand utiliser un robinet à boisseau sphérique
J'ai installé des centaines de soupapes au fil des ans.
Les robinets à tournant sphérique se distinguent dans ces situations :
1. Réparations d'urgence
Imaginez un peu : C'est dimanche soir. Un tuyau fuit sous votre évier. La quincaillerie ferme dans 20 minutes.
Une valve à glissière vous permet d'être réparé rapidement - aucune compétence particulière n'est requise.
2. Espaces restreints
Avez-vous déjà essayé de faire tourner une clé à pipe derrière un chauffe-eau ?
Ce n'est pas drôle.
Les soupapes à tiroir ne nécessitent aucun dégagement pour les outils. Il suffit de pousser et le tour est joué.
3. Projets de bricolage
Si vous n'êtes pas à l'aise avec un chalumeau ou avec le filetage des tuyaux, les vannes à tiroir sont votre ami.
Ils sont pratiquement infaillibles.
4. Installations temporaires
Besoin d'ajouter une vanne pour quelques mois pendant les travaux de rénovation ?
Les vannes à glissière vous permettent de retirer et de repositionner les tuyaux sans les détruire.
Quand les robinets à boisseau sphérique standard ont plus de sens
Mais voilà :
Les robinets à tournant sphérique standard dominent toujours pour de bonnes raisons.
1. Systèmes à haute pression
Exploitation d'une ligne d'air comprimé ? Tuyauterie industrielle ?
Vous avez besoin de la sécurité des raccords filetés ou soudés.
2. Installations permanentes
Pour les fermetures d'eau principales ou les vannes de systèmes critiques, optez pour le standard.
Ils sont conçus pour durer des décennies.
3. Applications à haute température
Les vannes à tiroir atteignent généralement leur maximum aux alentours de 200°F.
Les vannes standard ? Elles peuvent supporter une température de plus de 400°F avec les matériaux adéquats.
4. Exigences du code
Certaines juridictions n'autorisent pas les raccordements par emboîtement pour les installations permanentes.
Vérifiez toujours d'abord les codes locaux.
Installation : Comment fonctionne chaque type d'installation
Soyons pratiques.
Installation d'un robinet à boisseau sphérique (étape par étape)
- Couper le tuyau - Utiliser un coupe-tube pour obtenir une coupe nette et carrée.
- Ébavurer les bords - Lisser les éventuelles aspérités avec du papier de verre
- Marquer la profondeur d'insertion - En général, environ 1 pouce pour un tuyau de 1/2″.
- Pousser la valve sur - Pousser tout droit jusqu'à ce qu'il atteigne la cible
- Test - Ouvrir l'eau et vérifier l'absence de fuites
Durée totale : 2 minutes.
(Je l'ai littéralement fait pendant les pauses publicitaires).
Installation d'un robinet à boisseau sphérique fileté standard
- Préparer les fils - Nettoyer et inspecter
- Appliquer le mastic - Ruban de téflon ou colles pour tuyaux
- Filetage de la valve - Serrage à la main plus 1 à 2 tours avec une clé à molette
- Positionner correctement - S'assurer que la poignée fonctionne librement
- Essai de pression - Vérifier toutes les connexions
Durée totale : 15-20 minutes.
Plus sûr ? Absolument. Mais aussi plus de travail.
Compatibilité des matériaux : Ce qui fonctionne où
Tous les tuyaux ne sont pas compatibles avec tous les types de soupapes.
Les robinets à boisseau sphérique à tiroir fonctionnent avec :
- Cuivre (le plus courant)
- Tube PEX
- CPVC (vérifier les spécifications du fabricant)
Les robinets à tournant sphérique standard fonctionnent avec :
- Littéralement tout
- Acier, laiton, cuivre, PVC, etc.
La polyvalence des vannes standard est un avantage considérable pour les systèmes à matériaux mixtes.
Données sur les performances dans le monde réel
J'ai tiré quelques statistiques intéressantes d'études récentes du secteur :
Taux d'échec après 5 ans :
- Clapets anti-retour : 3-5% (principalement dégradation des joints toriques)
- Vannes standard : <1% (lorsqu'elles sont correctement installées)
Réduction des coûts de main-d'œuvre :
- Les vannes à tiroir permettent d'économiser 80% sur le temps d'installation
- Pour un travail résidentiel typique, cela représente $50-100 de main-d'œuvre.
Acceptation du code :
- 42 États autorisent les vannes à tiroir pour l'eau potable
- 8 États imposent des restrictions ou des permis spéciaux
Analyse des coûts : Vue d'ensemble
Parlons argent.
Pour une vanne typique de 1/2″ :
- Clapet anti-retour: $20 + $0 travail (bricolage) = $20 total
- Soupape standard: $8 + $75 main d'œuvre (plombier) = $83 total
Mais attendez.
Si cette vanne à glissement tombe en panne dans 5 ans et que la norme dure 20 ans ?
Les mathématiques changent.
Coût annuel à long terme :
- Clapet anti-retour : $20 × 4 remplacements ÷ 20 ans = $4/an
- Vanne standard : $83 ÷ 20 ans = $4,15/an
Il s'agit essentiellement d'un lavage à usage résidentiel.
Mes recommandations personnelles
Après plus de 20 ans de relations avec les deux types de personnes, voici ce que j'en pense :
Utiliser les robinets à tournant sphérique pour :
- Fermetures sous l'évier
- Raccordements du chauffe-eau
- Vannes de lave-linge
- Réparations d'urgence
- Rénovations dans des espaces restreints
Utiliser les robinets à tournant sphérique standard pour :
- Fermetures de l'eau principale
- Conduites de gaz (toujours)
- Systèmes commerciaux/industriels
- Installations extérieures
- Partout où la longévité est la plus importante
Les erreurs courantes à éviter
Je vois ces erreurs tout le temps :
Avec vannes à tiroir :
- Ne pas couper les tuyaux à l'équerre - Cause des fuites
- Oubli d'ébavurage - Endommage les joints toriques
- Utilisation sur des tuyaux encrassés - Sceau de compromis
- Dépassement des pressions nominales - La recette de l'échec
Avec des vannes standard :
- Serrage excessif - Raccords fissurés
- Mauvais produit d'étanchéité - Ruban de téflon sur les raccords évasés = mauvais
- Le cross-threading - Tout gâche
- Ignorer le sens du grain - Le ruban doit être enroulé dans le sens des aiguilles d'une montre
Le verdict : Lequel choisir ?
Voici mon arbre de décision simple :
Choisissez un robinet à tournant sphérique lorsque :
- C'est la vitesse qui compte le plus
- Vous bricolez
- Il s'agit d'une pression résidentielle
- Il se peut que vous deviez le déplacer
Choisissez un robinet à boisseau sphérique standard lorsque :
- C'est permanent
- Pression supérieure à 200 PSI
- Le code l'exige
- La longévité est essentielle
La vérité ?
La plupart des propriétaires devraient avoir les deux types de produits à portée de main.
Utilisez les vannes à glissement pour les réparations rapides et les endroits accessibles. Réservez les vannes standard aux raccordements critiques.
Regarder vers l'avenir : Quelle est la prochaine étape pour la technologie des soupapes ?
L'industrie n'est pas en reste.
Nouveaux développements que je surveille :
- Vannes intelligentes avec détection des fuites
- Modèles hybrides combiner les avantages
- Meilleurs matériaux pour les joints toriques pour les vannes à glissement
- Filetage sans outil systèmes
Mais pour l'instant ?
Les vanne à bille et vanne à bille coulissante Le débat porte sur vos besoins spécifiques.
Choisissez le bon outil pour le travail, installez-le correctement et vous aurez des années de service fiable.
C'est ce qui compte vraiment.