Sump pumps are critical systems that help prevent flooding in basements. But like any mechanical system, they can break down over time. One of the most important accessories you can install to protect your sump pump is a check valve. But do you really need one?
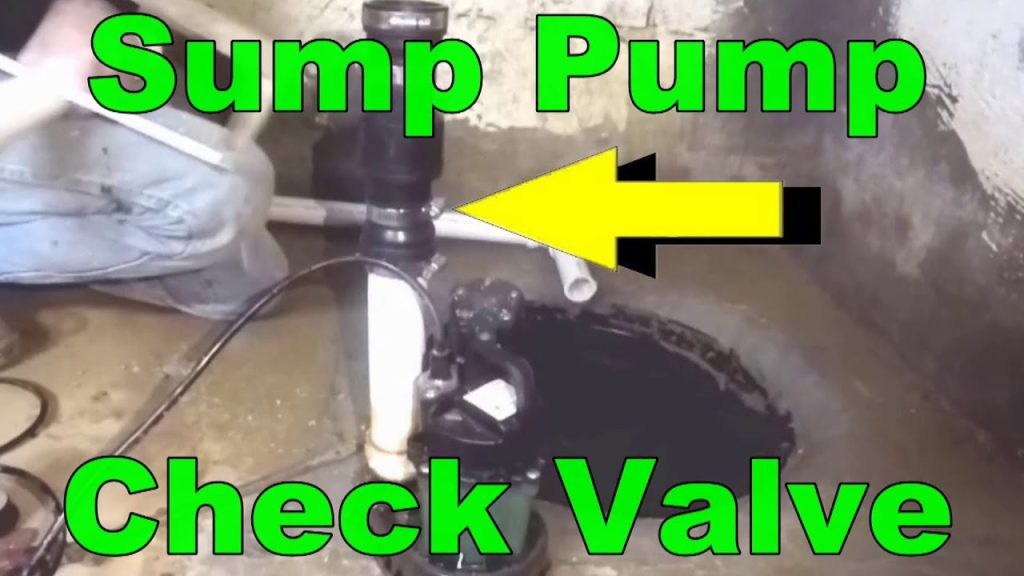
What is a sump pump check valve?
A sump pump moves water away from your home’s foundation and out to a safe discharge point. The check valve ensures that once this water leaves the pump, it can only flow in one direction – away from the home.
Without a check valve, water will flow backwards into the sump pit once the pump shuts off. This is called backflow. Backflow forces the pump to turn on more frequently to remove the same water again. Frequent cycling can cause a sump pump to wear out faster.
How a check valve stops backflow
A basic swing check valve uses gravity to close the valve once water stops flowing. A flapper inside the valve drops down over the opening when the pump shuts off. This prevents water from flowing backwards.
More advanced check valves use a spring to close. Spring-loaded check valves close slowly and quietly. Basic swing check valves close rapidly with an audible “clunk”.
Do you need a check valve on a sump pump?
Yes, you need a check valve on a sump pump. Installing a check valve on your sump pump is essential for preventing backflow, reducing short cycling, protecting the pump from damage, and ensuring efficient operation.
Why should you install a check valve?
There are two major reasons to use a sump pump check valve:
1. Save electricity
Stopping backflow prevents unnecessary sump pump cycles. Without a check valve, water flows back into the pit every time your pump shuts off. This can double or triple the number of times your pump needs to turn on to keep water moving. More cycles = higher electric bills.
2. Extend pump life
Frequent on/off cycles strain the pump motor. Motors that run hot have a shorter service life. Installing a check valve gives your sump pump longer breaks between run cycles. Less strain and heat extends the useful life of the pump.
What happens without a check valve?
Operating a sump pump without a check valve causes two major problems:
1. Short cycling
Short cycling refers to frequent on/off pump cycles happening close together. For example, some sump pumps may turn on and off over 200 times per day – that’s almost once every 5 minutes! This extreme frequency strains the motor and can lead to premature failure.
2. Ineffective dewatering
On each cycle, a sump pump removes less water without a check valve. For example, a pump may remove 10 gallons of water then shut off. Without a check valve, 6 gallons immediately flows backwards. So the net removal per cycle is only 4 gallons (10 gallons out minus 6 gallons back in).
Where should you install a check valve?
Always check your pump manufacturer’s instructions for specific check valve placement. But in general:
- Install the check valve a minimum of 6 inches above the pump discharge. This leaves room to drill a bleeder hole below the valve to prevent air locks.
- Position the valve just below floor level for easiest access. Choose an accessible location for future inspection and maintenance.
- Never exceed 18 inches above the floor. Mounting the valve too high allows excessive backflow between cycles.
Gravity pulls water back into the sump pit through the discharge pipe. Mounting the check valve close to the floor minimizes the “column” of water that can flow backwards.
Signs you need a check valve
Notice any of these issues? You probably need to install a check valve:
- Frequent pump cycling more than 10 times per hour
- Pit refills rapidly after pump shuts off
- Must run pump manually to effectively lower water
- High humidity in basement after heavy rain
- Signs of past flooding in basement
Any of these indicate your sump pump works too hard to remove water. A check valve installation can resolve these common problems.
Tips for installing a sump pump check valve
Installing a check valve is a straightforward DIY project. But here are some tips to make the job go smoothly:
- Shut power OFF to sump pump before starting
- Choose the correct diameter valve for your discharge pipe
- Ensure flow arrow points UP, away from the pit
- If using PVC cement, give joints 30 minutes to cure before testing
- Test for leaks and proper operation before leaving the site
With a simple swing check valve, you may hear a “clunk” sound when the flapper drops during testing. This is normal operation. Advanced check valves close slowly and silently.
Maintain your check valve
While sump pump check valves require little maintenance, you should inspect yours periodically:
- Visually check for cracks or damage
- Ensure unobstructed operation
- Clean out any debris, minerals, or other deposits
- Confirm adequate swing clearance all around
- Replace if flapper, seat, or seals look worn
Conclusion
While check valves are not an absolute requirement for sump pump systems, they are highly recommended. Stopping backflow saves electricity wasted by unnecessary pump run cycles. And eliminating short cycles extends the useful life of your pump.
If you notice signs of strain on your pit dewatering system, adding a check valve should help optimize performance. Just be sure to install it properly and inspect it periodically as part of your overall maintenance routine. Protecting your sump pump equals protecting your basement.