Introduction
Soldering, an essential skill in the plumbing, electronics, and jewelry industries, is more than fusing two metal surfaces together. Its main purpose is to create a tight, leak-free, reliable bond that ensures longevity and durability. This process particularly becomes vital when connecting a ball valve to a copper pipe.
Importance of Soldering in Plumbing and Electronic Industries
Soldering is pivotal in creating solid and reliable connections in different plumbing and electronics industry elements. It uses a filler metal, solder, which has a lower melting point than the joined parts. This method ensures a non-destructive connection of the components.
Benefits of Soldering a Ball Valve
Soldering a ball valve ensures a tight and leak-free bond between the valve and the pipe. This results in a strong, effective plumbing or electronic system lasting many years. The benefits of soldering a ball valve extend to efficiency and safety in these industries.
Understanding the Soldering Process
Before initiating the soldering process, it’s crucial to understand the differences between the types of solders and how to prepare your work area.
Difference between Plumbing Solder and Electrical Solder
Plumbing solder and electrical solder are made differently to fit their respective purposes. Electrical solder melts at a low temperature to avoid potential damage to electronic components, while plumbing solder can withstand higher temperatures, making it more suitable for soldering pipes. For a more detailed comparison, do check out Solder on Wikipedia.
Inspecting and Cleaning the Valve and Pipe
When preparing to solder a ball valve, cleanliness is vital. Ensure that both ports of the ball valve, the pipe ends, and the socket seating surfaces are free from foreign particles and metal shavings. Using steel wool or emery cloth is recommended to achieve a spotless surface.
How to solder a ball valve?
Preparation for Soldering
The preparation stage should not be overlooked before proceeding to solder a ball valve.
Applying Flux Paste to the Valve and Pipe
Cleaning the pipe and the valve is paramount. First, ensure that the copper pipe ends and the valve sockets are scrub-free of remnants; this process can be made easier using steel wool or emery cloth. Then, apply flux paste on every area to be soldered with a flux brush.
Positioning the Valve and Pipe Properly
Align the valve and pipe correctly before soldering. It’s advised to have the valve stem face upwards. Failure to properly align can result in structural failure or property damage.
Selecting the Right Torch Nozzle and Soldering Material
Next, choose a torch nozzle appropriate for the valve size and fuel gas. Always check the torch manufacturer’s recommendations. Regarding soldering, use no-lead certified soft solders with melting temperatures of less than 500°F.
The Soldering Process
The soldering process for a ball valve involves careful heat application and the use of solder to ensure a tight, leak-free connection.
Preventing Valve Overheating
Overheating is a common issue while soldering ball valves. An effective way to prevent this is to wrap the center section of the valve with a wet rag. This helps keep it cool, preserving the valve’s functionality and prolonging its lifespan.
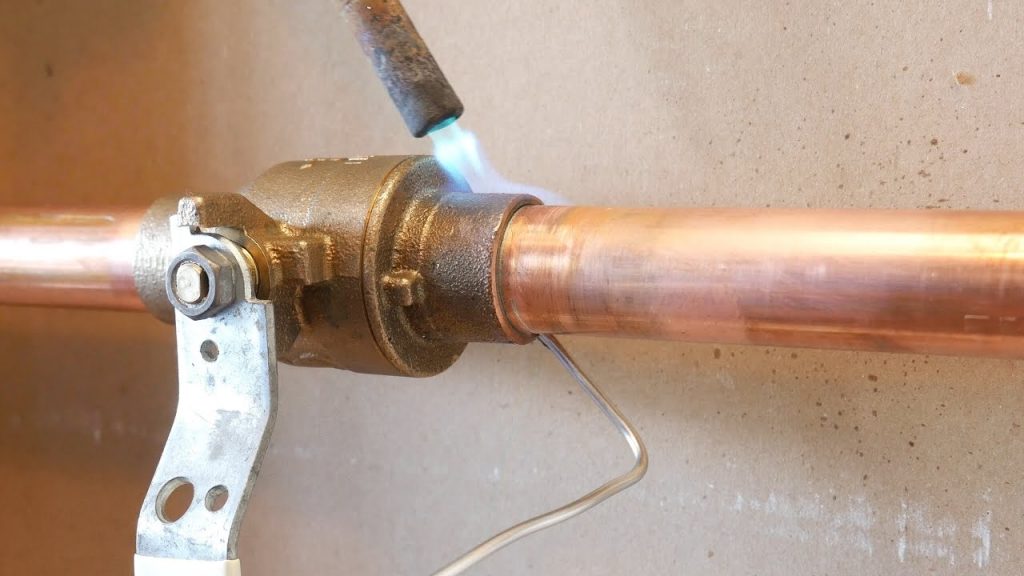
Directing Heat and Applying Solder
The flame should always be angled away from the valve body during the soldering process and primarily concentrated on the copper pipe. The plumbing solder should melt into the joint between the valve and pipe, making a watertight seal upon cooling.
Protecting Threads with Thread Sealant
To protect the threads of the fittings during soldering, apply a small amount of pipe dope or thread sealant. This prevents solder from sticking to the threads, preserving their integrity and ensuring a smooth connection process.
Post-Soldering Steps
After successfully soldering a ball valve to a copper pipe, it’s essential to follow a few steps to ensure the longevity and effectiveness of your work.
Allowing the Valve to Cool Naturally
Allow the ball valve and pipe to cool naturally. Quenching with water might stress the joint/connection unnecessarily.
Verifying the Tightness of the Packing Nut
Once the valve has cooled down, verify the tightness of the packing nut. A tight packing nut ensures a strong, reliable bond that lasts for years, making a watertight, electrically conductive connection between the ball valve and pipe.
Soldering a ball valve is not difficult; it’s all about precision and patience!
Conclusion
After a thorough examination of how to solder a ball valve, we’ve compiled a list of essential tips and best practices:
- Ensure the copper pipe ends soldered into the valve are square cut, clean, and free from foreign materials.
- Thoroughly clean the pipe ends and solder sockets using steel wool or emery cloth.
- Apply a thin layer of flux paste over the area that is to be soldered.
- Select a torch nozzle suitable to the fuel gas being used.
Importance of Proper Installation and Maintenance
Having learned the soldering process, let’s emphasize the importance of proper installation and maintenance. Ensuring the installation is done correctly and regularly maintained will greatly extend your ball valve’s life and performance. A correctly soldered ball valve ensures a strong and reliable bond, promising years of leak-free service.