How to measure butterfly valve size might seem straightforward at first glance. But here’s the thing: getting it wrong can cost you thousands in installation delays, system failures, and emergency repairs.
I’ve seen countless engineers and technicians struggle with this seemingly simple task. The problem? Most people focus only on the diameter and completely ignore the other critical dimensions that determine whether a butterfly valve will actually fit and function properly in their system.
In this guide, I’ll walk you through the exact process I use to measure butterfly valves accurately every single time. By the end, you’ll know exactly which dimensions matter, what tools you need, and how to avoid the costly mistakes that trip up even experienced professionals.
Sound good? Let’s dive in.
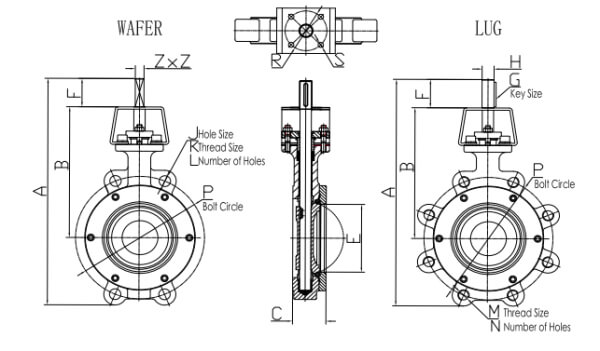
Table of contents
- Why Accurate Butterfly Valve Measurement Matters
- Essential Tools for Measuring Butterfly Valves
- How to Measure Butterfly Valve Size: Step-by-Step
- Key Dimensions That Most People Miss
- Common Measurement Mistakes (And How to Avoid Them)
- Industry Standards You Need to Know
- Practical Tips for Different Applications
- When to Call in the Professionals
- Advanced Measurement Techniques for 2025
- Conclusion
Why Accurate Butterfly Valve Measurement Matters
Before we get into the nuts and bolts, let me share a quick story that illustrates why this matters.
Last year, a major water treatment facility ordered replacement butterfly valves based on what they thought was the correct size. The valves arrived, but guess what? They didn’t fit. The face-to-face dimensions were off by just 2 inches.
The result? A 3-week shutdown that cost them over $200,000 in lost productivity.
Bottom line: accurate measurement isn’t just important—it’s absolutely critical.
Essential Tools for Measuring Butterfly Valves
Here’s exactly what you’ll need to get professional-grade measurements:
Primary Tools:
- Vernier caliper (digital preferred for accuracy)
- Steel ruler or measuring tape
- Precision caliper for seat measurements
- Flange gauge (optional but helpful)
Pro Tip: Invest in quality measuring tools. A $50 digital caliper will pay for itself the first time it prevents a sizing mistake.
How to Measure Butterfly Valve Size: Step-by-Step
Now it’s time for the main event. Here’s my proven 7-step process for measuring butterfly valves accurately:
Step 1: Identify the Valve Type
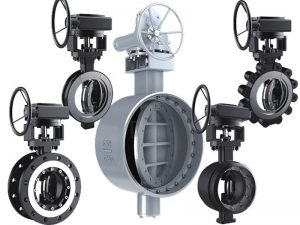
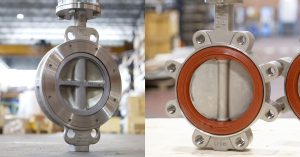
First things first: determine whether you’re dealing with a wafer, lug, or flanged butterfly valve. This affects which measurements you’ll need to take.
Wafer valves sit between two flanges
Lug valves have threaded holes for bolts
Flanged valves have their own flanges attached
Step 2: Measure the Nominal Diameter (DN/NPS)
This is the big one—the measurement everyone thinks they know how to take.
Here’s how to do it right:
- For accessible valves: Open the disc to full position and measure the internal diameter at the narrowest point
- For installed valves: Measure the flange bore diameter (this should match the nominal size)
- Take multiple readings around the circumference to account for wear
Common sizes range from:
- Small applications: 2-6 inches (DN50-DN150)
- Industrial systems: 8-24 inches (DN200-DN600)
- Large infrastructure: 30+ inches (DN750+)
Step 3: Determine Face-to-Face Dimensions
This measurement trips up more people than any other. Here’s why it’s critical: the face-to-face dimension must match your pipeline spacing exactly.
For wafer valves: Measure the body thickness from inlet to outlet sealing surface
For flanged valves: Measure from the sealing face of one flange to the sealing face of the opposite flange
Industry standards you need to know:
- API 609: Covers general-purpose butterfly valves
- ASME B16.10: Defines standard face-to-face dimensions
- ISO 5752: International standard for valve dimensions
Step 4: Measure Flange Specifications
If you’re dealing with flanged valves, you need these four critical measurements:
Flange Outer Diameter (OD)
Measure across the widest part of the flange
Bolt Circle Diameter (BCD)
Measure from the center of one bolt hole to the center of the directly opposite hole
Bolt Hole Count and Size
Count the holes and measure their diameter with calipers
Flange Thickness
Measure from the back surface to the sealing face
Step 5: Check Pressure Ratings
Don’t skip this step. Pressure ratings directly impact valve construction and dimensions:
- Class 150: Up to 285 PSI working pressure
- Class 300: Up to 740 PSI working pressure
- Class 600: Up to 1480 PSI working pressure
Higher pressure ratings mean thicker flanges and larger bolt patterns.
Step 6: Measure Valve Seat Dimensions
For maintenance and replacement purposes, you’ll need these seat measurements:
- Inner diameter (ID)
- Outer diameter (OD)
- Seat thickness
- Seat height
Use a precision caliper for these measurements—accuracy is crucial here.
Step 7: Document Everything
Here’s something most people forget: document your measurements immediately.
Create a simple chart like this:
| Dimension | Measurement | Notes |
|---|---|---|
| Nominal Diameter | 8 inches | DN200 |
| Face-to-Face | 2.5 inches | ASME B16.10 |
| Flange OD | 11.75 inches | Class 150 |
| Bolt Circle | 9.5 inches | 8 holes |
Key Dimensions That Most People Miss
After measuring hundreds of butterfly valves, I’ve noticed that people consistently miss these critical dimensions:
Overall Height
Measure from the bottom of the valve body to the highest point (actuator or handwheel). This determines clearance requirements.
Stem Diameter
Critical for actuator compatibility and maintenance access.
Actuator Mounting Pattern
If your valve has an actuator, measure the bolt pattern and dimensions.
Pro Tip: Take photos of the valve from multiple angles. These will be invaluable when specifying replacements months or years later.
Common Measurement Mistakes (And How to Avoid Them)
Let me share the top 5 mistakes I see all the time:
Mistake #1: Measuring at the Wrong Location
The Problem: Measuring the valve body OD instead of the internal flow diameter
The Solution: Always measure the internal bore diameter for sizing
Mistake #2: Ignoring Flange Face Types
The Problem: Not distinguishing between flat face, raised face, and RTJ flanges
The Solution: Identify the flange face type before measuring and note it in your documentation
Mistake #3: Forgetting About Gaskets
The Problem: Not accounting for gasket thickness in face-to-face measurements
The Solution: Always note the gasket type and thickness requirements
Mistake #4: Mixed Units
The Problem: Mixing metric and imperial measurements
The Solution: Pick one system and stick with it throughout the entire process
Mistake #5: Skipping Cross-Reference
The Problem: Not verifying measurements against manufacturer specifications
The Solution: Always cross-check your measurements with published standards when possible
Industry Standards You Need to Know
Different industries and regions use different standards. Here’s what you need to know:
North American Standards
- ASME/ANSI B16.5: Flange dimensions
- API 609: Butterfly valve specifications
- MSS SP-67: Butterfly valves NPS 1½ to 72
International Standards
- ISO 5752: Face-to-face dimensions
- DIN EN 558: European valve standards
- JIS: Japanese Industrial Standards
Bottom line? Know which standard applies to your application before you start measuring.
Practical Tips for Different Applications
HVAC Systems (2-12 inch valves)
- Focus on face-to-face dimensions for ductwork compatibility
- Class 150 flanges are most common
- Pay attention to actuator clearance requirements
Water Treatment (8-48 inch valves)
- Emphasize corrosion-resistant materials identification
- Check for special coatings that might affect dimensions
- Document any custom modifications
Industrial Process (4-36 inch valves)
- Pressure rating verification is critical
- Chemical compatibility affects material selection
- Temperature ratings impact gasket and seat specifications
When to Call in the Professionals
Sometimes, measuring butterfly valves requires specialized knowledge. Call in a professional when:
- Working with exotic materials or special applications
- Dealing with high-pressure systems (Class 600+)
- Measuring critical safety systems
- Working with custom or modified valves
The cost of professional consultation is always less than the cost of getting it wrong.
Advanced Measurement Techniques for 2025
Technology has improved valve measurement significantly. Here are some cutting-edge approaches:
3D Scanning
For complex custom valves, 3D scanning creates precise digital models with all dimensions captured automatically.
Digital Documentation Systems
QR codes and digital tags are making valve identification and measurement tracking much more reliable.
Augmented Reality Tools
AR apps can overlay measurement guides and specification data directly onto the valve during inspection.
Conclusion
Learning how to measure butterfly valve size correctly is one of those skills that separates the professionals from the amateurs.
Get it right, and your systems run smoothly for years. Get it wrong, and you’re looking at costly shutdowns, emergency repairs, and a lot of explaining to do.
The key takeaways? Use the right tools, follow a systematic process, document everything, and always cross-reference your measurements against industry standards.
Remember: measuring butterfly valves isn’t just about the diameter. Face-to-face dimensions, flange specifications, pressure ratings, and seat measurements all play critical roles in ensuring proper fit and function.
Master this process, and you’ll never have to worry about ordering the wrong valve again. Pretty cool, right?

