Installing a ball valve properly is crucial to prevent leaks and ensure smooth operation. While the process may seem complicated, it’s actually straightforward if you follow some key steps.
In this complete guide, I’ll walk you through the entire ball valve installation process, from choosing the right valve to testing for leaks. You’ll learn the optimal valve orientation, how to connect different types of ball valves, as well as maintenance tips.
Let’s get started!
Why Learn to Install a Ball Valve?
Ball valves are versatile fittings used to start, stop and regulate flow in plumbing, HVAC, fire suppression systems, industrial equipment, and more.
Knowing how to install them correctly will allow you to:
- Complete plumbing projects
- Replace worn ball valves without calling a plumber
- Quickly isolate sections of pipework in an emergency
- Save money on professional installation fees
It’s also a useful skill to have under your belt as a homeowner, facility manager or anyone who works with piping systems.
While the process may seem intimidating, I’ll break it down step-by-step to make it manageable. By the end, you’ll have the knowledge to install ball valves like a pro.
Ball Valve Installation Equipment
To install a ball valve you’ll need:
- Ball valve
- Pipes/fittings to connect the valve
- Cutting and deburring tools
- Wrench
- Thread sealant or plumber’s tape
- Pipe wrench (for large valves)
- Soldering torch (for solder connections)
Make sure you get the right size and type of ball valve for your application before getting started.
Now let’s go through the installation steps.
How to Install a Ball Valve
Step 1: Check Valve Orientation
Ball valves can be installed vertically or horizontally in piping systems. However, there are some orientation guidelines you should follow:
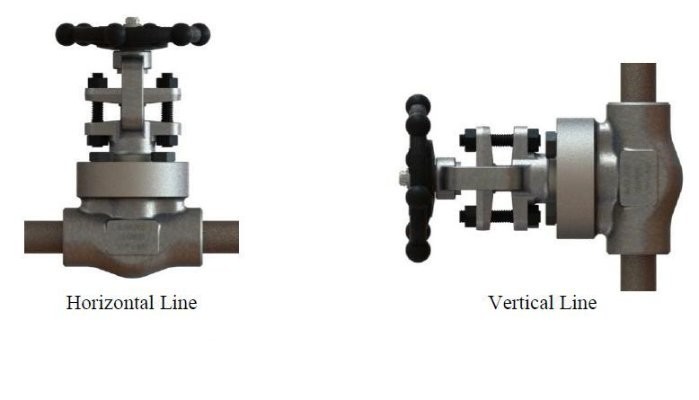
Vertical Installation
Vertically installing the valve with the stem pointing upwards is the optimal orientation. Benefits include:
- Debris falls away from the stem packing, preventing premature wear
- The stationary ball is supported against gravity, unlike in horizontal installations
- Easy to operate
- Required orientation for automated valves
Horizontal Installation
Horizontally installed valves function fine too. However, debris can collect on the stem packing causing it to wear out faster.
Install the valve with the stem vertical, rather than upside down. This prevents debris accumulation on the stem.
Ideally, point the handle towards the flow direction for easy identification. But ball valves are bi-directional so flow orientation isn’t critical.
Step 2. Shut Off Water Supply and Drain Pipes
Before breaking into the piping system to mount the valve:
- Locate main, branch and fixture shutoff valves and turn them off.
- Open nearby faucets and showers to drain the pipes. Water should trickle to a stop.
- Check that the pipes are fully depressurized before proceeding.
Doing this prevents water from spraying out when you cut into the pipes in the next steps.
Step 3. Cut Pipe
Measure and mark the pipe where you want to mount the ball valve. The stem neck – rather than the full valve body length – should be your reference point.
Then use a pipe cutter to slice the pipe squarely and cleanly:
- Tubing cutter for thin-wall copper pipes up to 1 1⁄4” diameter
- Mini-hacksaw for stainless steel, black iron and galvanized steel pipes
- Ratcheting PVC cutter for plastic pipes
Avoid using friction saws as they can leave burrs.
Step 4. Deburr Pipe Ends
Use a deburring tool, knife or metal file to remove any internal and external burrs or sharp edges from the cut pipe end.
Burrs prevent proper valve seating and damage seals, leading to leaks. So completely smoothing out the cut end is vital.
Step 5. Prepare Valve and Pipe Joint
Based on the pipe material and valve connection-type, prepare the joint as follows:
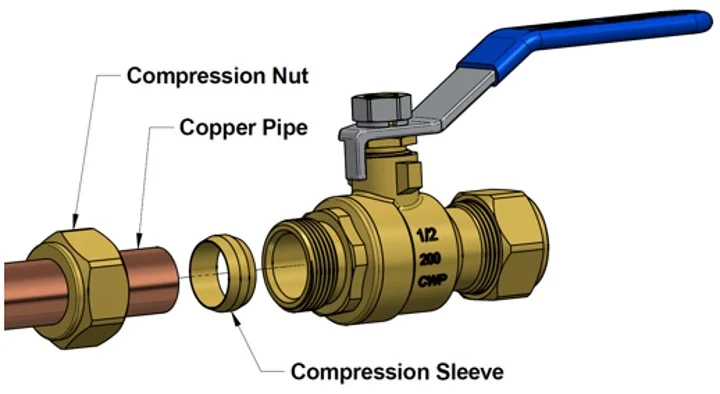
For Threaded Valves
Wrap the male pipe threads evenly with either plumber’s tape or thread sealant paste. This prevents leaks.
Make sure to leave the first thread bare. Else, loose tape can break off and clog the valve when tightening.
For Soldered Valves
Clean oxide coating off copper pipes using emery cloth. Valves and fittings should also be free of oil and grease.
Apply water-soluble flux paste to the pipe end using a brush. Flux cleans and preps the surfaces for soldering.
For Flanged Valves
Inspect flanges to ensure they’re clean and undamaged. Set flange bolts loosely in place ready for tightening later.
Step 6. Connect Ball Valve to Pipes
With preparation complete, now physically mount the ball valve onto the pipes:
For threaded valves:
Hand tighten the valve initially. Then use a wrench to further tighten it onto the threaded pipe. But be cautious not to overtighten to avoid splitting the valve or pipe.
For soldered valves:
Insert the copper pipe into the valve end. Rotate and position the joint correctly.
Use a propane torch to evenly heat the joint till solder melts and flows into it. Allow it to cool and solidify before handling.
Be careful when heating near the valve. Excessive direct heat can melt and damage seals and seats inside.
For flanged valves:
Insert flange gasket between valve and pipe flanges. Ensure correct alignment.
Evenly tighten flange bolts using a criss-cross sequence. This avoids mechanical stress and bolt loosening later on.
Connect any outlets or extensions from the ball valve using fittings compatible with your pipework.
Step 7. Pressure Test Installation
Before returning the valve to service, pressure test to check for leaks:
- Slowly restore the water supply and pressurize the system.
- Spray/brush on some leak tester solution or soapy water around the joints and stem. Observe carefully for growing bubbles which signal leaks. Tighten joints as needed to stop minor leaks.
- For critical processes, a hydrostatic pressure test well above the operating rating is recommended.
- Open and close valve a few times while pressurized to ensure smooth operation without leaks.
If major leaks persist, there’s an underlying issue that requires complete dissasembly to rectify.
Step 8. Return System to Service
Once confident that there are no leaks or other issues:
- Remove any pressure gauges installed to test.
- Fully open shutoff valves that were closed earlier.
- Open valve slowly and bleed air from the line until water flows smoothly.
- Your ball valve is now ready for operational service!
And remember to close valves before carrying out any future downstream plumbing work. Using the valve to safely isolate sections needing repair is one of its key benefits.
Ball Valve Maintenance Tips
While ball valves rarely need maintenance, especially under moderate temperatures and pressures, some things prolong service life:
1. Lubricate regularly: Occasionally lubricate the stem and seals with waterproof grease per manufacturer instructions. This prevents drying and ensures smooth valve handling.
2. Cycle valves: Infrequently used valves should be opened and shut every few weeks. This verifies smooth operation and prevents seizure.
3. Inspect annually: Check annually for early signs of wear, corrosion and leakage that require attention. Tightening the gland nut can temporarily restore minor stem seal leaks.
In Conclusion
Learning how to install a ball valve correctly takes patience and practice. But once mastered, you’ll able to reap the rewards in terms of reliable plumbing systems.
Hopefully this guide has simplified the process for you. Let me know if you have any other ball valve queries in the contact forms or email!